Why You Need a Blog Post Template (& How to Create One)
I’ve said it before and I’ll say it again (and again, and again 😁): Blogging is one of the best things you can do to build a strong online presence for your business and brand!
Lots more background on the reasoning for this in my other blogging resources, which walk through how to use your blog to boost SEO, grow your website traffic and share expertise to establish trust with new customers/clients—so I’ll refrain from repeating it all here.
But moral of the story: it’s a great idea to incorporate a blog into your website!
And, using a branded blog template can help save time and optimize your regular blog posts.
Why you should work from a blog post template
Creating a blog post template and using it to structure blog posts on your Squarespace website is beneficial in several ways:
Intentionally creating a template allows you to incorporate key elements that should be included in each post (see items below—hint, hint! 😉).
It saves time by reducing duplication of custom elements (such as the items below!).
It establishes a consistent structure and branding for each post. As readers will (ideally!) be clicking through to other related posts on your site, this helps provide a cohesive user experience across all of your blog content.
The template serves as an outline for each new blog post. This makes your blogging life easier, as it both outlines the post structure for you (streamlining your writing process), and ensures you don’t forget to include any key pieces.
What to include in your blog post template
Though your blog post template could include a wide variety of elements based on what makes best sense for your specific business needs, here are some common elements I tend to recommend for most purposes:
Related posts reel
Adding a “related posts reel” to the bottom of each blog post helps to connect readers to additional content that may be of interest to them.
This is nice for the reader (makes it easy to click through to related content when they’re done with a given post) as well as good for you (keeps visitors on your site longer, interacting with more of your content, and getting to better know you and your services).
It’s also beneficial for your website’s SEO to have visitors spend more time on your site before leaving.
How to create a related posts reel in Squarespace
You can easily create a related posts reel on your Squarespace blog by using the Squarespace summary block.
You’ll just link it to your blog and filter by specific categories and/or tags. You can choose to display the summary block in either a grid layout (selecting a specified number of suggested posts—3 is common), or as a carousel, which the reader can click to scroll through additional suggested content.
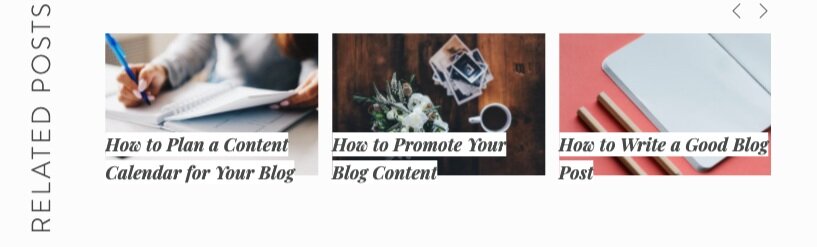
For example, here’s the related posts reel I include at the bottom of our blog posts (it’s a Squarespace summary block with the carousel layout):
Here are more detailed instructions on creating a related posts reel, as well as a recommended plugin that can be used instead if you prefer!
Opt-in gift
If you have an opt-in gift or content upgrade you use to grow your email list, you can add this to your blog post template so every blog post includes an opportunity to a) provide additional content of value, and b) offer readers the opportunity to connect with you further via your email list.
How to add an opt-in gift to your Squarespace blog posts
Your opt-in gift can be included via either the Squarespace newsletter block (which supports sign-ups directly on your blog post page, no clicking away required—yay!) or with a button or image link to your opt-in “sales” page.
I like to style Squarespace image cards to specifically serve as blog post opt-in offers. These aren’t used elsewhere on my site, so I can reserve their styling for this specific purpose.
For example, this is the Blog Post Checklist opt-in included at the bottom of this post:

Here are more detailed instructions for adding opt-ins to your Squarespace website (+ some of my favorite opt-in gift ideas!).
Newsletter sign-up
No opt-in gift yet? No problem!
Each blog post is a great opportunity to offer access to your newsletter. If a reader is enjoying your content, they may certainly wish to join your list to receive regular content and updates from you.
I suggest including an opt-in of some sort in each blog post, and a newsletter opt-in can be a great option.
This can be easily added with the Squarespace newsletter block, which will collect email addresses directly from your blog post, rather than requiring readers to click away to a separate subscribe page (extra clicks can make people lose interest).
Here’s an example of the newsletter opt-in used at the bottom of each blog post on the Four Wellness Co. blog:

Social share button message
Squarespace blog posts include built-in social share buttons so viewers can easily share your content to social platforms with the click of a button.
In most Squarespace templates, these buttons can be stylized directly from your site’s style editor (Design > Site Styles).
Typically, you’ll have the option to choose if they should be displayed above or below post content. (I recommend displaying them below, as most people aren’t prone to sharing content they haven’t read yet.)
In some style settings, the social share icons can look quite similar to your site’s social links. These icons, though appearing similar, perform very different functions: your general site social links connect visitors directly to your linked social media pages (your business Facebook page, Instagram account, etc.), while the blog post social share icons allow readers to share your blog post content to their own social media accounts.
Particularly if your website happens to include your business social links in your footer, it can be a good idea to include a message about social sharing at the bottom of each blog post (to display right above the social share buttons), clarifying what those little icons do.
This message can simply be added with a text block at the very bottom of your blog post template.
Here’s an example from the Four Wellness Co. blog:

Blog post bio
I also recommend that each blog post conclude with a blog post bio—a brief section at the bottom of the post describing who you are, what you offer, and how a reader can connect with you further.
Not only does this help to add context and authority to your post, as well as provide clear calls-to-action connecting readers to your services, but it’s also great for SEO! (Your descriptive “bio” or statement should, in theory, include your business’ primary keywords.)
A blog post bio can be added with simply a text block and an image block (if you’d like to include your logo or a photo of you), and perhaps a button linking to your promotion of choice (like a Services page, Shop page, etc.).
Here’s the blog post bio that’s included at the bottom of each of my blog posts:

Author bio
A bit different from a general “blog post bio,” an author bio can be used if your blog includes posts from multiple authors and you’d like to distinguish between them and provide a unique bio for each author.
This can be set up in Squarespace by designing a separate blog specifically for author bios, using the thumbnail image and post excerpt to display the desired “bio.”
You’d then add a summary block to your blog post template and set it to display only a specifically tagged “post” from the author bios blog—so it will pull in only the correctly tagged author bio. (Each author would be assigned a different tag.)
Blog post signature
Depending on the nature of your blog and whose voice it’s written from, it’s possible to include a blog post signature—in other words, a personal sign-off that signals to readers who the post was written by, as well as adds more branding and personality to your post.
This can be added to your template as an image block or a combination of image and text blocks.
The blog post signature could stand alone, or be included as part of your blog post bio mentioned above.
Here’s an example blog post signature (added as an image block):

Blog post summary or takeaways
Depending on your content, it may make sense or be helpful for your readers if you summarize the content of your post or key takeaways at the bottom of each blog post.
Here’s an example from Four Wellness Co.—each blog post is closed with a “Four Wellness Tip” (a specific action item related to the post content):

Special font or image formatting
It’s also a good idea to include any special font or image formatting you’d like to use in your blog posts within your blog post template.
For example, here I use special font formatting to create vertical text in the related posts reel at the bottom of each post (ooh, magic!), and this is stylized in my blog post template so it appears properly in each new blog post, without having to be re-created each time.
Other examples of custom styling to add to your blog post template might be special image effects, or bolding/italicizing certain labels or fonts.
It’s also a good idea to ensure that any image(s) used repeatedly in your blog post template are formatted according to proper Squarespace image guidelines—namely, their size, aspect ratio, file name (and hidden caption for SEO!).
How to create & use a blog post template in Squarespace
Once you’ve determined the specific branded elements you’ll need in your blog post template, here are the steps to create and save the template for future use:
1. Create a new blog post
Create a new blog post under Pages > Blog by clicking the + icon in the upper right of the blog post panel.
2. Add content & formatting
Add the desired content to your post (bio, related posts reel, newsletter opt-in, etc.), based on your needs. Format the content as you’d like it to appear on all future posts.
3. Save & name
Title the post “Template” and save. Tip: Change the template post date to a future date, so it will always appear at the top of your blog post list and remain easy to find in the future.
4. Duplicate post
To create a new post, hover over the Template in your blog posts panel and click Edit when it appears. At the bottom of the post, click Duplicate. This will duplicate the template for use as your new post.
Note: When duplicating the blog post template, the post URL will not automatically populate with your new post title. You’ll need to manually change the URL to suit your post title, which you can do via Edit Post > Options > Post URL.

Grow your business & brand with content your audience loves!
Grab my free Blog Post Checklist: