How to Grow Your Website Traffic on Autopilot
I’ve shared lots before about my favorite strategies for building a website and promoting your content to expand your reach and grow your business.
As you may know, I’m a big fan of content marketing and using Pinterest to promote your blog content—it’s my favorite, most cost-effective way to grow your website traffic!
(And, of course, growing traffic to your website not only helps connect your business with more interested audience members and prospective customers/clients, but also helps to grow your SEO, because search engines look more kindly upon webpages or blog posts that are already well-trafficked.)
So, one of the best ways to jumpstart your website traffic and SEO as a new business owner is to use content marketing via Pinterest. 💃
Why Pinterest is so helpful for your business
Though it’s sometimes mistakenly thought of as a social media platform, Pinterest is really a visual search engine. It helps people find specific content they’re looking for.
And because of this, it’s typically more effective than other forms of “social media” (which it technically isn’t…) at driving traffic to your website—and thus new audience members and clients/customers to your business!
Here’s a closer look at exactly how I recommend new businesses set up a streamlined system to grow your website traffic with Pinterest—all on just a few hours per week!
This post contains affiliate links through which I may earn a commission if you choose to purchase, at no additional cost to you. As always, these are products or services I personally use & love!
How to use Pinterest to grow your website traffic
It’s no secret how much I love using Tailwind for Pinterest growth—I’ve shared before that it’s my favorite tool for scheduling and sharing content on Pinterest. Here’s why:
Batch schedule your pins: Pinterest prioritizes regular, consistent posting, and batch scheduling allows you to pin regularly throughout the day, without having to do so manually.
Schedule pins to maximize engagement: Tailwind automatically creates a pinning schedule that’s optimized for audience engagement.
Shuffle queue: When you batch schedule pins, it’s convenient to shuffle your queue to evenly distribute content, rather than pinning a bunch of pins on one topic or from one source all at once.
Create Board Lists: Conveniently group boards that are frequently used together to streamline your pinning process.
Repurpose your content with SmartLoop: Use the “SmartLoops” Tailwind feature to repurpose your best evergreen content to continue to drive traffic to your website.
Grow faster with Tailwind Tribes: Join Tailwind Tribes to connect with like-minded businesses and pinners to share your content with new audiences.
How to use Tailwind to grow your website traffic
Here’s exactly how I set up Tailwind to grow traffic to our website, and the exact strategies you can use to grow traffic for yours:
1. Set up your Pinterest account
First, you’ll prepare your Pinterest account for Tailwind. I’ve shared more specific details on how to set up your business’ Pinterest account, but the basic steps are:
Sign up for your free Pinterest business account
Activate your Pinterest rich pins
Create the Pinterest boards you’ll use in Tailwind (and remember to thoughtfully choose the board names and customize the board descriptions—valuable Pinterest SEO!)
2. Set up your Tailwind account
Next, you’ll set up your Tailwind account and connect it to your Pinterest account.
It goes without saying that I wouldn’t use this tool if it wasn’t worth every penny, but full disclosure that Tailwind is a paid app, and there are various levels of “PowerUps” to further enhance its functionality (which we’ll chat through more below).
Tailwind offers a free trial for the first 100 pins, so you can set up your account as you follow along with the steps below at no cost:
I won’t go too in-depth on basic set-up, since the Tailwind team has very helpful set-up guides and videos in-app. Just a few quick set-up tips and we’ll be on our way!
Here’s what you’ll want to set up first in Tailwind:
Set your schedule: I recommend most businesses looking to grow their reach post 30+ times per day. When first starting, you may be pinning less than this and that’s totally okay—just set your schedule for the number of pins you’d like to share per day and Tailwind will create an optimized schedule for you.
Set up Board Lists: Streamline your future pinning by setting up your Board Lists (Publisher > Board Lists). These are groups of boards you’ll typically use together, and grouping them allows you to schedule pins to all of them in one click, rather than individually. (You’ll use this later in Step 4!)
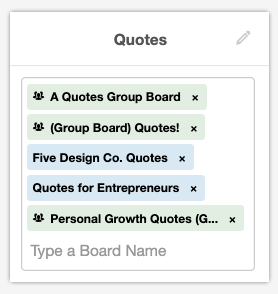
Here’s an example Board List, used to publish new motivational quote pins. It allows us to schedule to five boards with just one click! (And, if we add more quote-related boards in the future, we can continue to add them to this Board List to efficiently schedule to them all.)
You’ll see both our own boards (blue) and group boards we belong to (green) on this Board List.
3. Create & schedule pins
Create your branded pins in the design software of your choice. We use Canva, which is a great all-around design software option for small business owners (and quick to learn).
Canva has plenty of properly-sized pin templates you can work off of to create your own branded pins.

Once your pins are designed, you’ll upload them to Tailwind (Publisher > Drafts). A few important tips as you do this:
Link: Update the pin link to the specific page or blog post you’re promoting.
Description: Add a keyword-rich description. This should be a bit different than your blog post excerpt (which will be carried along with your rich pin into Pinterest anyway).
Boards: Add the specific boards you’ll be pinning to (here’s where your previously set-up Board Lists come in handy!).
Schedule: If you’re adding the pin to multiple boards, it’s a good idea to use the Use Interval scheduling feature to stagger them. Schedule when the pin will post to its first board and set the interval for remaining boards (we aim for 3-10 days, depending on the type of post).
When ready, click Add to Queue and off they go!
You can see your entire queue of scheduled pins in your Publisher dashboard.
This is also where you can quickly add new pins or shuffle your queue if you’ve recently added or curated multiple pins of similar content.

4. Set up SmartLoop
Now here’s where things get fancy. Rather than continuously re-schedule your evergreen content pins, let’s set them up to come back again automatically!
Here’s how to set up SmartLoop pins for your evergreen content:
Create a new SmartLoop: Create a new SmartLoop in your Tailwind dashboard via Publisher > SmartLoop > New Loop. You’ll name your loop (it’s just an internal label) and choose the default boards this loop will post to. You can add or delete boards on specific pins later, so choose the set of boards that most pins in this loop will be sent to.
Add pins to your SmartLoop: Select which pins you’d like in your SmartLoop.
Set your SmartLoop schedule: Define how often your SmartLoop will publish pins to its boards, and how many days SmartLoop should wait before publishing the same pin to a different board. Tailwind will automatically add your SmartLoop pins into optimized time slots in your queue.
Set board rules: Some group boards have daily limits and it’s also a good idea to intentionally space your content, so SmartLoop allows you to set frequency limits for each board in your list. The ideal number varies by board, but is usually 1-3 pins per day.
A few considerations when setting up your SmartLoops:
Add your top-performing pins: We don’t want to be recycling content that didn’t do very well the first time around—it’s best to add your highest-performing pins to your SmartLoops, so you can continue to maximize their reach.
Consider multiple loops: Some pins are relevant to multiple SmartLoops.
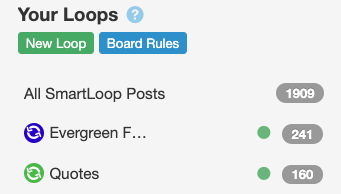
Note that one pin to one board counts as “one” SmartLoop post—so 160 posts in the Quotes Loop shown here would be 32 pins being looped to the five boards in our “Quotes” Board List.
5. Join Tailwind Tribes
A significant part of growing your website traffic quickly is finding ways to expand the number of people who are seeing and re-sharing your pins on Pinterest.
However, when first starting out, your Pinterest account likely has only a few followers—which means less exposure and a slower rate of growth.
Enter: Tailwind Tribes.
I recommend Tailwind Tribes for businesses serious about growing your website traffic as rapidly as you can, especially in your early stages of Pinterest content marketing.
How Tailwind Tribes grows your content faster
Tailwind Tribes is a fantastic method for growing your reach on Pinterest even faster. Here’s how it works:
You join relevant/likeminded Tribes in Tailwind (Tribes > Find a Tribe).
You submit pins to your Tribes… and your Tribemates re-share them.
You browse + re-share your Tribemates’ pins to your curated feed.
Everyone’s happy!
To show how quickly this works, here’s a screenshot of our first three months’ activity in Tailwind Tribes back in the day:

Though 9.7k pins submitted may seem like a lot (and it is!) that’s about three pins per day submitted to an average of 50 Tribes—which is only about 64 days of actively submitting pins. It takes about five minutes to submit those three pins each day and about an hour weekly to re-share content from other Tribemates.
So, in total, that’s about six hours monthly of actively using Tailwind. It’s truly a tool that automates traffic generation for you!
(For more information on typical results with Tailwind Tribes, please see Tailwind’s data on this.)
Tips for maximizing the benefit of Tailwind Tribes
Here are a few tips for maximizing the benefit of using Tailwind Tribes to grow your Pinterest reach and website traffic:
Most Tribes have a 1:1 share ratio (meaning, you add one piece of content and you share one piece of content) and a max of three pins per day. Be sure to follow the rules, or you may be removed from the Tribe by its owner/admin.
I recommend joining as many Tribes as you can find that are relevant to your business, and sharing to them daily.
Monitor your Tribes’ activity to see which are most beneficial to you, and which might not be the best use of your time. Some Tribes are more active, and some are less active. Some have members with large Pinterest followings, and some are primarily newer members with smaller followings. This all impacts your results from each Tribe.
6. Curate content
For growing businesses, I usually recommend pinning about 30-50% your own content and the rest curated content.
It’s helpful to install the Tailwind Publisher Google Chrome extension, which makes curating content from around the web a breeze.
Tailwind tip: Get the PowerUps
What are Tailwind PowerUps & do you need them?
Though we tend to be on the more minimalist side of paid business tools, we actually think Tailwind PowerUps are totally worth it. The PowerUps allow you to get the most out of the Tailwind tools that are so central to your traffic growth—Tribes and SmartLoop.
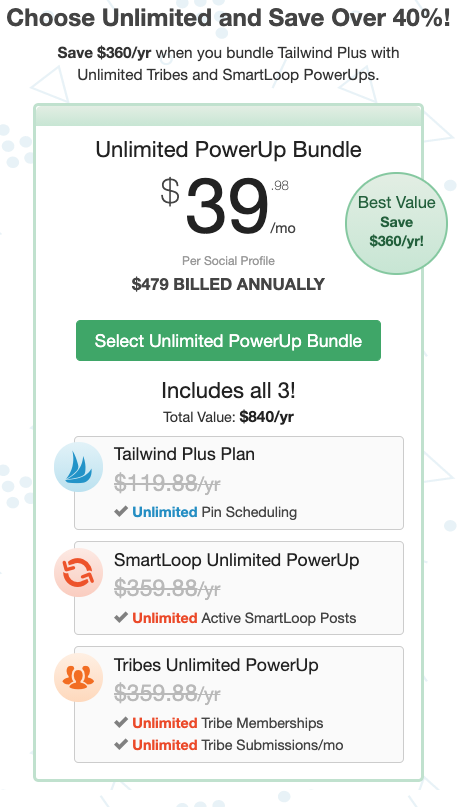
image via Tailwind
I recommend going for the best value—the Unlimited PowerUp Bundle, which includes Tailwind Plus, the Tribes Unlimited PowerUp and the SmartLoop Unlimited PowerUp.
That means you get unlimited SmartLoop posts, unlimited Tribes memberships and unlimited Tribes submissions.
Paid annually it’s $479 and saves you $360 (40%!). For most businesses we work with, it’s certainly worth $40 monthly to grow your website traffic and audience and connect with more potential customers.
But! Even though I recommend the Unlimited PowerUp Bundle for maximum impact in growing traffic to your website (and thus growing your business!), you can get started for free—Tailwind offers a free trial (up to 100 pins) so you can set things up and see how it works for you.